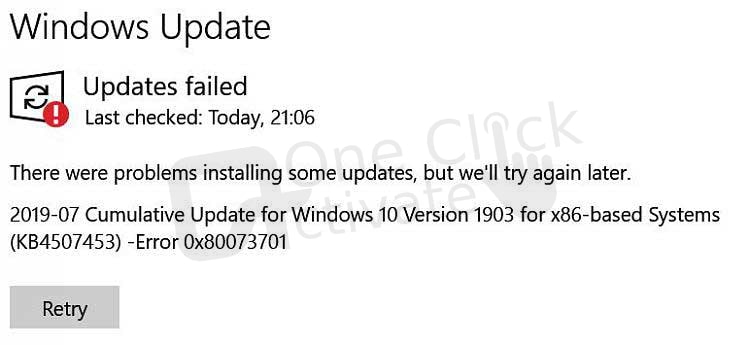
Windows Update enables you to obtain and install security updates that shield your computer from harmful malware and other forms of assaults. Nevertheless, it may sometimes create major difficulties, which will ultimately result in an error notice with directions on how to fix the situation. When attempting to upgrade to Windows 10 or 11, you could run into issues such as the Windows Update error 0x80245006, which is one of these problems. If you are also having a similar issue, then this guide might assist you in finding answers on how to fix Windows Update Error 0x80073701 on Windows 10/11.

Table of Contents
If you are attempting to install the most recent updates on your Windows 10 or Windows 11 machine, but you keep receiving the windows update error 0x80073701, you should follow the instructions that are outlined below.
The troubleshooter for Windows Update is a built-in utility that can assist users in repairing typical issues that arise with Windows Update. It’s possible that upgrades won’t fix every problem, but they should address a good number of them. To use the troubleshooter, do the following steps in order:
This will launch the Windows Update application, which will then begin looking for problems that are pertinent to the current installation. It will take some time for the troubleshooter to do its job, but if it discovers and resolves any issues, you will be informed of this.
Editor’s recommendation: Fix Microsoft Teams Keeps Reinstalling Itself
If you are attempting to update Windows and get the Windows update error 0x80073701, the problem is most likely by a damaged system file. You can try using the utility known as System File Checker to fix any system files that are either missing or corrupted and then see if this resolves the problem. The instructions that are provided below will walk you through using this tool:
In the event that executing the System File Checker tool does not resolve the issue, you may attempt fixing the issues with your Windows Update components by using the Deployment Image Servicing and Management (DISM) tool instead.
It might be possible that a component of Windows Update is either broken or not installed at all, which is causing this Windows update error 0x80073701. In the event that this is the case, you may attempt to reset the Windows Update components. You will need to delete the “SoftwareDistribution” and “catroot2” directories in order to get rid of any temporary files that could be causing the issue and to coerce Windows into downloading new ones. To use this tool effectively, follow these steps:
To determine whether or not the Windows update was successful, you will need to restart your computer.
Also Read: Install Google Play Store on Windows 11
If you’ve been having trouble fixing an issue that’s been caused by Windows Update, there’s a strong possibility that completing a clean boot will solve the problem. When you start Windows with a minimum collection of drivers and initial applications, you are doing what is known as a clean boot. Using this method might assist you in troubleshooting problems by removing software conflicts.
Check to see whether the problem has been fixed after you have finished the actions outlined above.
When attempting to upgrade their operating system, many Windows users come across the dreaded error code 0x80073701 that is associated with Windows Update. The issue might have been caused by a number of different factors, but the most probable explanation is that system files have been corrupted. Other possible causes include malicious software, files that are already damaged, or Windows Update components that are either broken or missing.
So, this is how you can fix the Windows Update Error 0x80073701 on Windows 10/11. We’ve included five different ways of doing so and tried to keep the steps as simple as possible. But if you still encounter any issues, you can leave them in the empty comment area below. We’d love to be of assistance to you.
It is possible that your computer may become vulnerable to dangers such as malware if you do not install the most recent Windows updates. You also run the risk of missing important security fixes that might safeguard your data, as well as encountering issues with the system’s speed and reliability.
If you do not want your operating system to automatically update, you may stop the automatic updates feature in Windows 10 to prevent it from doing so. This is particularly helpful if your internet connection is poor or restricted, or if you want to read up on an update before downloading it, since any of those situations may prevent you from installing it immediately.
1. Make a search for the Services program by clicking the Search button in Windows, and then launch it after you find it.
2. Scroll down until you find “Windows Update,” then right-click on it and pick “Properties” from the context menu.
3. On the “General” tab, choose “Disabled” from the “Startup type” drop-down menu by clicking on the drop-down menu’s drop-down arrow.
Uninstalling the Windows update could be a good idea if you notice that your computer is performing more slowly than normal or if you are having other problems with it.
1. Launch the “View update history” window by navigating to “Settings -> Update and Security -> View update history” in Windows 10.
2. Choose “Uninstall updates” and then choose the update that you wish to delete from your computer’s installation.
3. Go to “System -> Windows Update -> Update History” if you’re using Windows 11 and want to see your update history.
4. Simply choose the update from the drop-down menu that appears after clicking the “Uninstall updates” link at the bottom of the page.
In addition, if you feel like you need a break, you may temporarily suspend Windows Updates.
Published On : January 18, 2023 by: Anjali Latwal/Category(s) : Windows
Leave a Reply