
transfer physical sim to esim: If you’re planning on purchasing a new iPhone that supports iOS 12.1.1 or later, then congratulations, you’re qualified to use an eSIM. With this guide you will learn how to transfer physical Sim to eSim
With recent developments, conventional SIM cards are being replaced by eSIMs (embedded SIMs). This new digital SIM technology is becoming increasingly popular, with telecom providers such as AT&T, T-Mobile USA, Truphone, Ubigi, and Verizon Wireless all supporting it.
If you’re upgrading from an older iPhone model, you may be wondering how to transfer your old SIM card to your new eSIM. Luckily, it’s a relatively simple process. First, you’ll need to back up your old iPhone. Once you’ve done that, you can activate your new iPhone and sign in with your Apple ID. Then, go to Settings Cellular Data Plans and Add a New Plan. From there, you can select your old SIM card and transfer your data over to your new eSIM.
So if you’re planning on upgrading to a new iPhone that supports eSIM technology, there’s no need to worry about how to transfer your old SIM card. The process is relatively straightforward and should only take a few minutes.
Table of Contents
Before getting started with the process to transfer physical sim to esim, check these requirements:
If you already fulfill all these requirements, follow these quick and effective steps to transfer your physical SIM card:

This is an easy and precise guide to making a smooth transfer of a Physical Sim to an eSIM.
Brownie Read: How To Stream And Activate Charge TV Live?
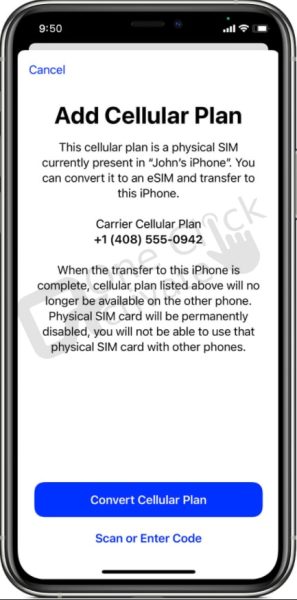
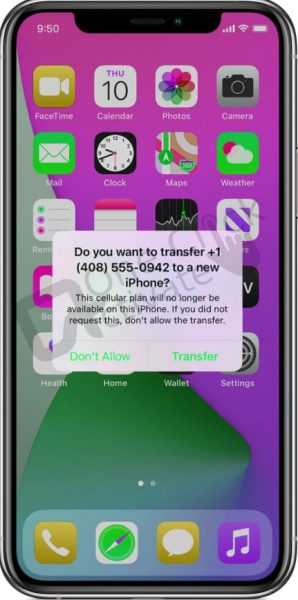
Follow these procedures to transfer physical Sim to eSim or convert the physical SIM* from your old iPhone to an eSIM on your new one if Quick Start setup prompts you to Transfer Cellular Plan:
NOTE: When switching to an iPhone 13 model or an iPhone SE, you can change a physical SIM to an eSIM during Quick Start setup (3rd generation).
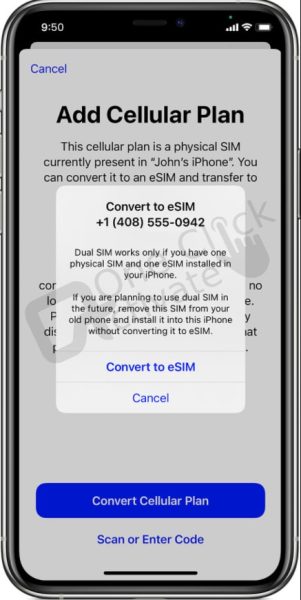
One physical SIM card and one eSIM card are required to use Dual SIM on an iPhone XR, iPhone XS, iPhone 11, or iPhone 12 model. You might need to either keep your physical SIM or convert your physical SIM to an eSIM if you upgrade to one of these handsets. Whether your second line is an eSIM or a real SIM depends on the situation. Dual SIM is compatible with two eSIMs or a physical SIM and an eSIM on iPhone 13 models.
An eSIM commonly known as an embedded SIM card is used as a replacement for the physical SIM card. Unlike the traditional SIM card, the eSIM is small in size and is fixed onto the device’s motherboard. You aren’t required to insert an eSIM, and nor can you remove it. However, it doesn’t mean that you can’t change carriers or switch carriers. Transferring your regular physical SIM to an eSIM is not a lengthy process anymore. You can easily transfer physical SIM to eSim by following the steps mentioned above!
Useful Topic: Boost Mobile SIM Card
Herein, you can learn and follow the proven guidebook instructions on how to transfer a SIM card to eSIM and use it on your iPhone.
Note: This process is applicable only for those who have the latest iPhone gadget or a device that runs on iOS 14 or later.
To make a smooth SIM Card Transfer To eSIM, you need:
With Apple iOS 13.1 and later, some carriers or telecom operators support transferring your eSIM easily without even following some major steps. All you need to do is just contact your carrier and ask for help with the transfer process.
Trending Read: eSIM Prepaid Plan Activation using T-Mobile App
Without the real SIM card attached, the eSIM is inoperable. Your device loses service if you remove your physical SIM card. Reactivate Fi with your eSIM or reinstall your SIM card to resume service.
You can utilize two eSIMs for two or more cellular plans on the iPhone 13 Pro Max, iPhone 13 Pro, iPhone 13, and iPhone 13 small. Alternatively, you can use a physical nano-SIM for one cellular plan and an eSIM for one or more additional cellular plans.
However, there are a few potential drawbacks to eSIMs. It is not as simple to switch devices quickly. Currently, you may easily remove the SIM from your phone and place it in another one to use in case it stops operating while preserving your phone number and contact information (if your contacts are stored on the SIM).
Yes, there are considerable security advantages. While removable SIM cards can occasionally be stolen and used in port out scams, an eSIM card cannot be stolen without also stealing the phone.
To use your eSIM subscription to access the internet, you can designate it as your primary data plan. To discover how to choose your primary data plan, follow these steps.
There is no need to manually insert the eSIM. On the same device, eSIM and SIM can both be used simultaneously. This means that both a physical card and one of the eSIM numbers will function simultaneously. By adding the new device to your mobile account, the prior number can be automatically set up on it.
Published On : February 1, 2023 by: Sakshi Sharma/Category(s) : eSIM
Leave a Reply