If you’re one of the many people who have started using Microsoft Teams to stay in touch with your peers during the coronavirus outbreak, you might be finding the experience a bit difficult. Despite the platform’s extensive capabilities, its unfriendly user interface can be tough to get used to. After days of trying, many new users find themselves compelled to delete the application. But not anymore! If your “Microsoft Teams Keeps Reinstalling Itself”, then we have a step-by-step guide prepared for you below!
If you’re facing the issue of Microsoft Teams keep reinstalling itself on your Windows 10 pc, then you’re not alone. Many users have reported this error and it can be quite frustrating. However, don’t worry as we will take a look at the major steps to fix this error and help you get rid of it for good.
First and foremost, you need to check if there are any pending updates for Teams. To do this, simply open the Teams app and go to the Help & Feedback section. If there are any updates available, download and install them. Once that’s done, restart your pc and check if the issue has been resolved. If the issue persists, then you need to uninstall Teams completely from your pc. To do this, go to the Control Panel and select ‘Add or Remove Programs’. From the list of installed programs, select Microsoft Teams and click on ‘Uninstall’.
Once Teams has been uninstalled, restart your pc. After that, download and install the latest version of Teams from the official website. Once that’s done, check if the issue has been resolved. If you’re still facing the issue of Microsoft Teams keep reinstalling itself, then you need to contact the support team for further assistance.
Useful Topic: Set up Microsoft Autofill
Table of Contents
If you’re looking for a business communication tool that offers workspace chat, videoconferencing, file storage, and application integration, Microsoft Teams is a great option. Teams compete with similar services like Slack but offer a few key advantages that make it a more appealing choice for businesses. First, Microsoft Teams integrates with the rest of the Office 365 suite, making it a more seamless experience for users who are already familiar with other Microsoft products.
Second, Teams offers a richer set of features and customization options, allowing businesses to tailor the tool to their specific needs. Finally, Teams is backed by Microsoft’s extensive enterprise support infrastructure, making it a more reliable option for businesses that need a robust communication solution. If you’re considering a business communication tool, Microsoft Teams is definitely worth a look.
Unlike most of the applications out there, this Microsoft product comes with a failsafe. Meaning, that even after uninstalling Teams, it keeps installing itself. The reason being is the “Teams Machine-Wide Installer” that simply creates the “Microsoft Teams Keeps Reinstalling Itself” issue and again logged in to the account.
To resolve this problem, you need to put in twice the effort, as you need to remove the Machine-Wide Installer, right after uninstalling the application.
Now that you know the reason why Microsoft Teams is auto-installing itself, you can finally remove it by following these steps. Below we have provided an excellent guide for complete Microsoft Teams uninstallation and stopping it from installing again automatically.
Important Note: To start implementing the useful steps, make sure that Microsoft Teams is not currently operational on your Windows PC. To quit Teams just right-click on the Teams icon available in the taskbar and select the Close window option.
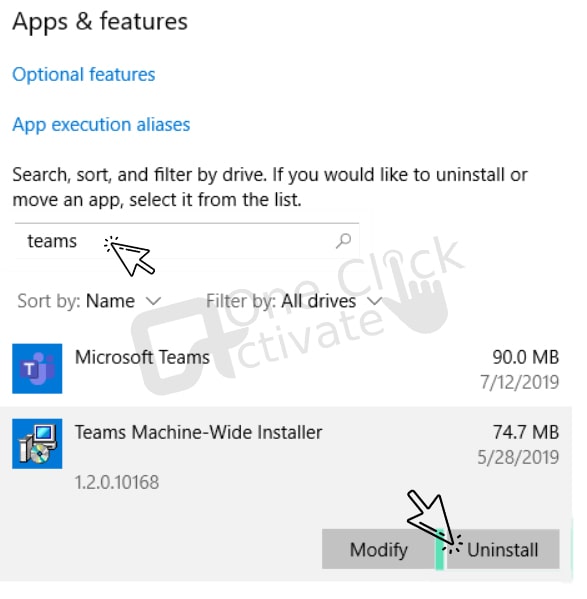
When you install Teams on your Windows 10 pc, you are installing two software at the same time i.e. Microsoft Teams and Teams Machine-Wide Installer. Check the steps below to delete them permanently.
Guide To Uninstall Microsoft Teams –


Guide to Uninstall Teams Machine-Wide Installer

Brownie Read: Organization’s Data Cannot be Pasted Outlook fixes
To permanently uninstall the Teams app from your macOS device, pursue the steps below. But before anything, make sure that the Microsoft Teams app isn’t currently running on your Mac device. For quitting the application, make sure to right-click the Teams app and long-press the Options button to click Force Quit.

By using these steps, next time Teams won’t automatically reinstall itself and it will stay deleted from your system till you download and install Teams again on your device.
Must Read- Why Did Microsoft Roll Back The Latest Update
This is because Microsoft Team comes with a failsafe named “Teams Machine-Wide Installer.” And to permanently remove the application from your Windows pc or MacOS you need to uninstall both Teams Machine-Wide Installer and Microsoft Team application. From the above-guided steps, you can do the same and stop the Team from installing again automatically.
As explained above in the post, you will require to uninstall Teams Machine-Wide Installer to permanently remove Microsoft Teams. If you only uninstall the main Microsoft Teams app, you will face the Microsoft Teams Keeps Reinstalling Itself’ Issue as the service will install automatically again and will pop up on your pc screen.
Well, in that case, Microsoft Teams keeps reinstalling itself on your Windows 10 PC and will easily launch itself on the next boot.
Stop Teams from automatically installing: Machine-Wide Installer for Selected Teams Click Uninstall, then carry out the steps that follow. All done! Your computer has been entirely cleaned of Microsoft Teams. The program will not be reinstalled the following time you log in.
This seems to be brought on by a bug in Teams’ cache, which makes it reopen. For more information and a PowerShell script that cleanly deletes cache files while forcing some apps (IE, Edge, and Chrome) to close, visit this website.
1. Select the Startup tab.
2. Click Disable after selecting Microsoft Teams.
3. Check Microsoft Teams’ settings to see if they can be adjusted to help:
4. the start of Microsoft Teams
5. Select Settings by clicking the Profile symbol in the top right corner.
6. Clear the Auto Start Application checkbox as you scroll down.
As soon as a user logs in, the MSI’s default behavior is to install the Teams app and then launch Teams. After Teams is installed, you can utilize Group Policy to make a policy setting or turn off the auto-launch for the MSI installer if you don’t want users to launch it automatically.
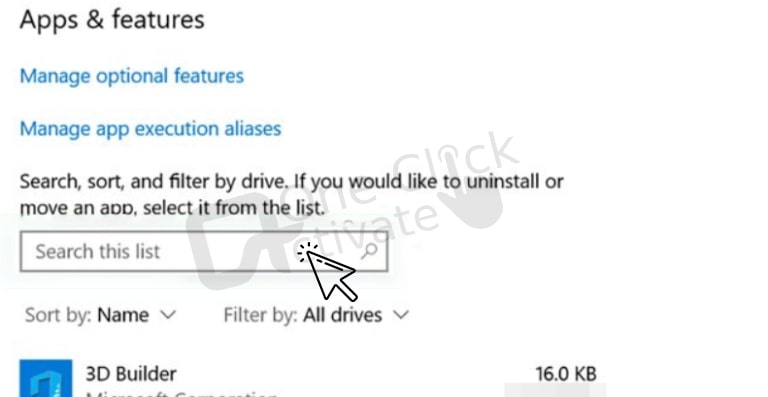
1. Remove Microsoft Teams
2. Close the window by selecting Quit Teams by right-clicking the Teams icon in the taskbar.
3. Click the Start button in Windows.
4. Search “teams” in the Apps & Features section.
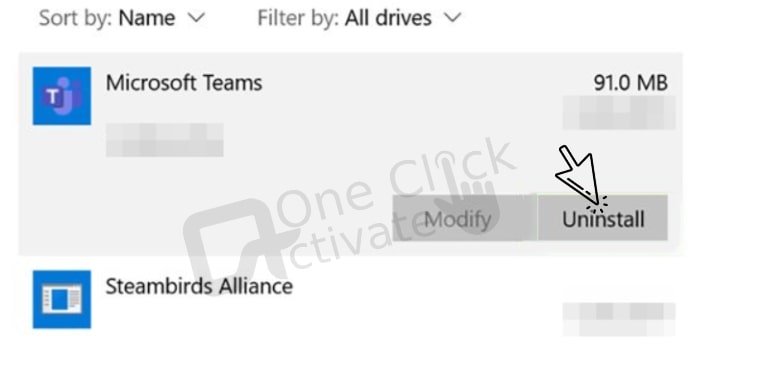
5. Microsoft Teams should be highlighted, then choose Uninstall.
6. A box will show up; choose Uninstall once more to confirm.
In 2017, Microsoft introduced its unified communications platform, Microsoft Teams. Many thousands of people favor using it frequently for work chats, video meetings, and other purposes. However, occasionally your system launches this application each time you switch it on.
Published On : September 19, 2022 by: Sakshi Sharma/Category(s) : Microsoft, Windows
Leave a Reply