Home » eSIM » eSIM Activation on Smart Device with Airtel, Jio, and VI in India
eSIM Activation on Smart Device with Airtel, Jio, and VI in India
Popular Telecom operators – Reliance Jio, Vodafone Idea (VI), and Airtel now offer a technology called eSIM (a digital SIM), which can replace the whole idea of using a physical SIM card. The eSIM can easily be downloaded on eSIM enabled devices, which means from now onwards you don’t need to buy an extra SIM card to use services. With this, all private telecom operators allow their millions of users to use this facility without paying an additional cost for its activation. Meanwhile, users have to follow up some basic steps to avail eSIM cards on their compatible device. As of now, smartphone brands like Apple, Google, Samsung, and Motorola have started the eSIM services on popular networks (Airtel, Jio, and Vi). Similarly, Apple users might require to have an iOS version that is 12.1 or higher to be well-matched with the eSIM.
Important Note: Airtel and Jio prepaid customers, as well as postpaid users with compatible Esim devices, can convert their physical SIM cards into eSIMs, whereas for Vodafone Idea Vi postpaid customers are eligible to activate eSIM on their devices.
eSIM stands for “Embedded Subscriber Identity Module” is an embedded SIM inside your phone, a smartwatch, or any other compatible device that is comfortable with the idea of digital SIM cards. In case, you are thrilled to know more about the activation, then these eSIM stays on the device and cannot be pulled out physically from the gadget like an old physical SIM card. To work efficiently, these embedded SIM needs to be supported by your active carrier to work. Currently, the facility is valid only for Jio, Airtel, and Vodafone Idea users in India. Once you complete the eSIMactivation process, you will be able to make and take calls, send SMS, and use the internet facility. Additionally, these SIMs are eligible to support all the regular networks such as 4G and 5G without an issue.
eSIM Activation in India: What Are the Compatible Smartphones/Devices?
Back in 2018, the eSIM conceptwas approved by Jio and Airtel, but later on, Vi aka Vodafone Idea also likes the concept and grants a green signal for their active 4G users. Below you can find a list of devices that actually approved the eSIM support in India concept.
Smartphone Brands
Model Name
iPhone Models
Supported iPhone models are: iPhone XR iPhone XS iPhone XS Max iPhone 11 iPhone 11 Pro iPhone 11 Pro Max iPhone SE (2020) iPhone 12 mini iPhone 12 iPhone 12 Pro iPhone 12 Pro Max
Samsung Phones
Supported Samsung phones include the model list: Samsung Galaxy Z Flip Samsung Galaxy Fold Samsung Galaxy Note 20 Ultra 5G Samsung Galaxy Note 20 Samsung Galaxy Z Fold 2 Samsung Galaxy S21 5G Samsung Galaxy S21+ 5G Samsung Galaxy S21 Ultra 5G
Motorola Razr and Motorola Razr 5G are the only supported devices that allow eSIM card activation
If you are eagerly waiting to use eSIM with any of these telecoms (as mentioned above), here is a detailed guide that you need to follow. But before starting to pursue the steps, make sure to connect to a Wi-Fi router throughout the activation process.
All you need is to head over to the nearest Jio Store or a Reliance Digital outlet for the process. Once you reach the outlet, talk to Jio representatives and ask for the Jio eSIM activation. The working executives will ask you to provide the eSIM compatible phone’s IMEI number to check whether your device is compatible or not. You can get your phone IMEI number by keying these digits (*#06#) in the keypad of your device. After this, you will be required to fill the Customer Acquisition Form (CAF) and fill in all the relevant details in it. With these details, a unique QR code will be generated for you and then you can follow the further instructions provided below.
Important Note: When you visit your nearest Jio Store, Jio Retailer, or Reliance Digital outlet, don’t forget to take your proof of Identity and photograph. As this is a mandatory step to follow.
For Apple models:
To start the process, be sure that you are having an iOS version 12.1 or higher. In case, you don’t have one, upgrade it as soon as possible to make your device eSIM ready.
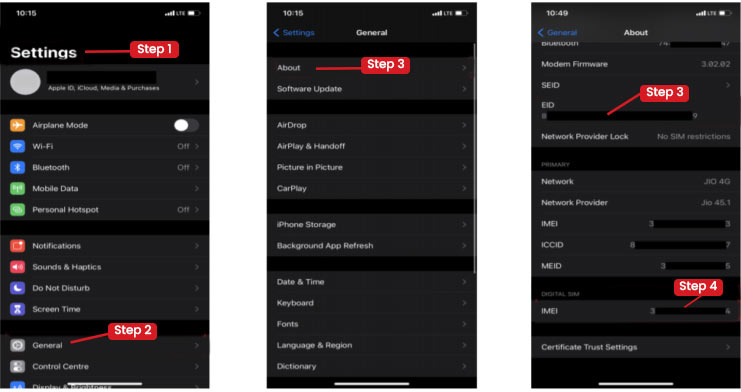
Now, you will need to send SMS in the following manner – GETESIM <32 Digit EID> <15 Digit IMEI> to 199 from the Apple model you own with an active Jio SIM in.
In the next step, go to Settings and tap on it. Then search for the option “About phone” to look for EID and IMEI numbers.
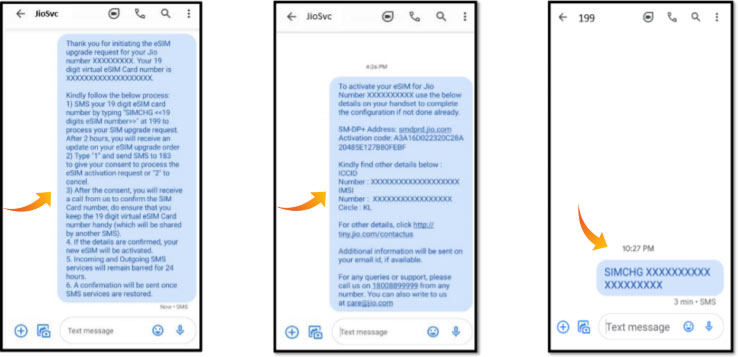
Once you share all the above-mentioned details, you will get a 19 digit eSIM number along with eSIM profile configuration details. Don’t delete the message, as it contains the activation code which you required for the further process.
Type SIMCHG <19 digits eSIM number> and send it to 199. Wait for around 2 hours, as the company will share an update on your eSIM processing.
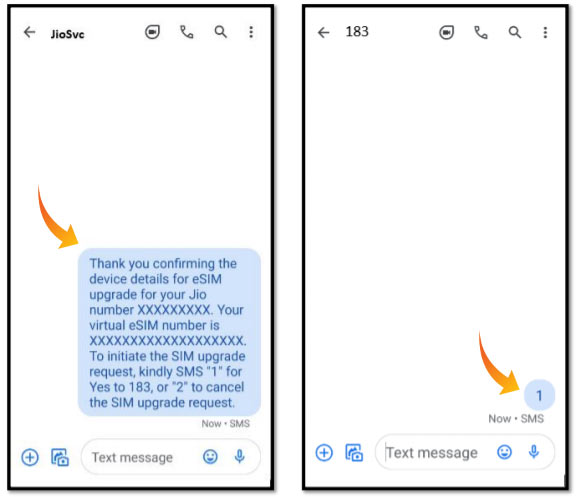
Once you receive the message, confirm the same by sending to ‘1′ to 183 as an SMS form.
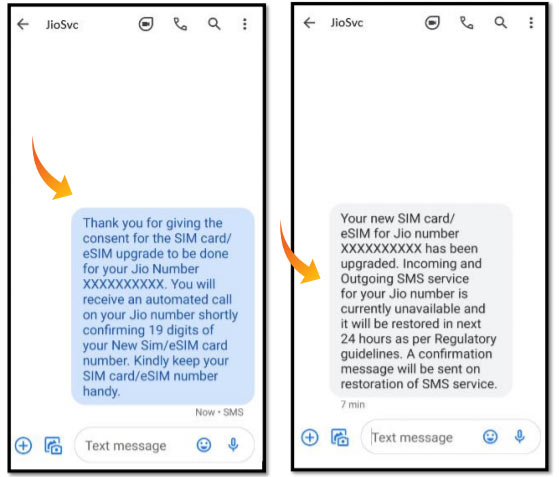
Now, you will get an automated call requesting you to share the 19 digit eSIM number. For this, keep your eSIM number handy.
Shared the details and you will receive a confirmation of activation of your new eSIM number through SMS.
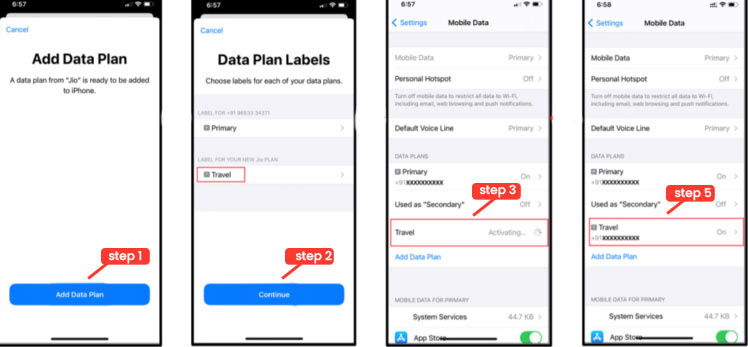
Once you are done, with the above-mentioned steps, it’s time to create an eSIM profile and configure it on your iPhone.
For this, head to the Mobile Data option in Settings and then click on Add Data plan. Now, select the option “Enter details manually”.
You will be asked to enter smdprd.jio.com in the SM-DP+address column and you will receive the activation code via SMS or Email.
Go to the Activation code section, and enter the code you received.
After entering the code, click Next and then head towards Add Data plan to select and confirm the new mobile plan.
Navigate to the Data Plan Labels and select Continue and finally, your Jio eSIM is activated and configured successfully.
For Samsung models:
Follow the steps from 2 to 10 as mentioned above then proceed with these:
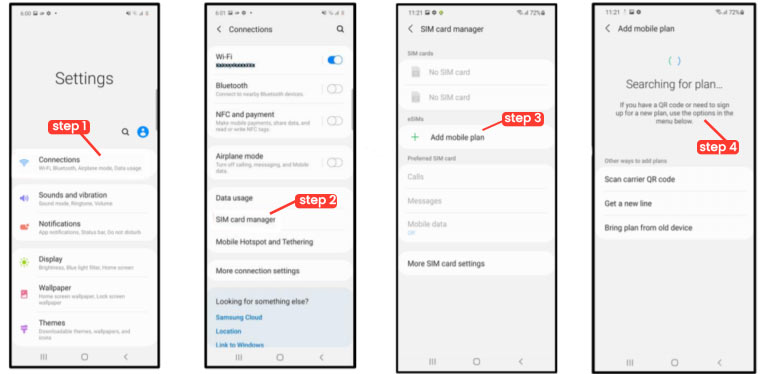
Go to Settings and then click on Connections.
In the next step, select the option SIM card manager.
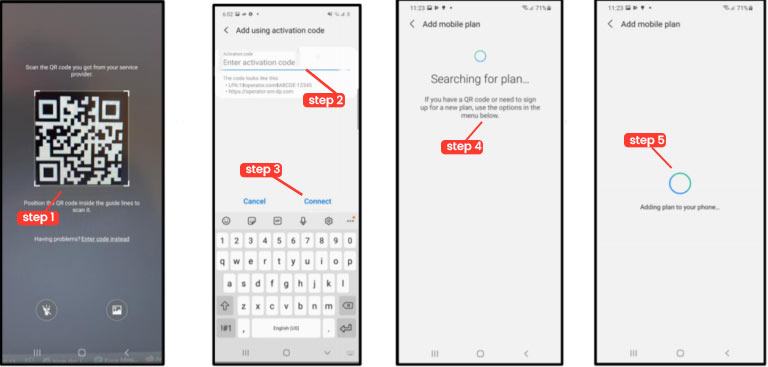
Click on the Add mobile plan and then head over to the Scan Carrier QR code.
Next, to enter the activation code, select Enter code instead and start typing the code, which you get via SMS.
Now, in the activation code column, enter the same in this format only: LPA:1$smdprd.jio.com$Activationcode and click Connect.
After selecting the appropriate plan, your Jio eSIM is now activated on your Samsung phone and will now show up in the SIM card manager option.
For Google models:
Go exactly from Steps 2 to 10 as mentioned above for iPhone, and then:
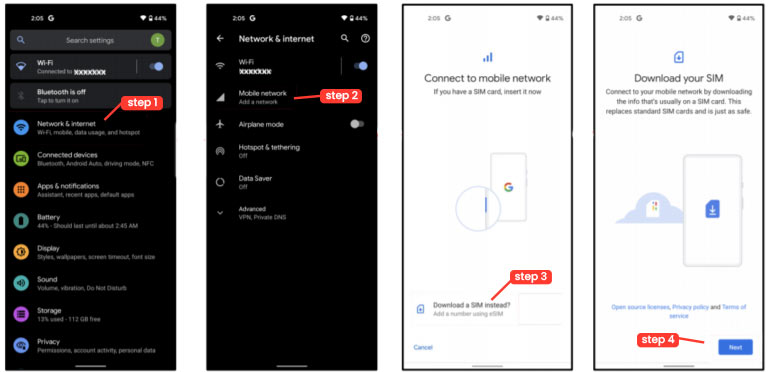
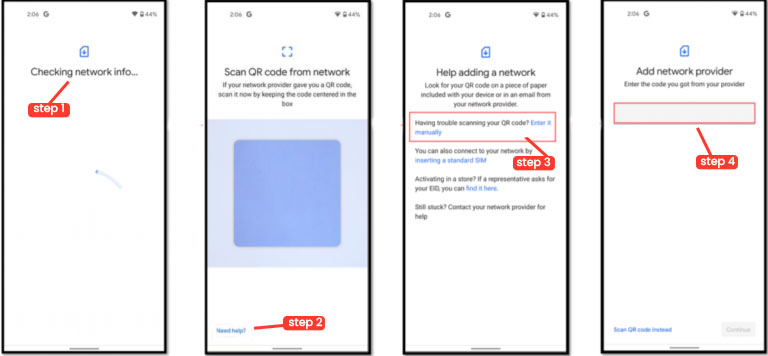
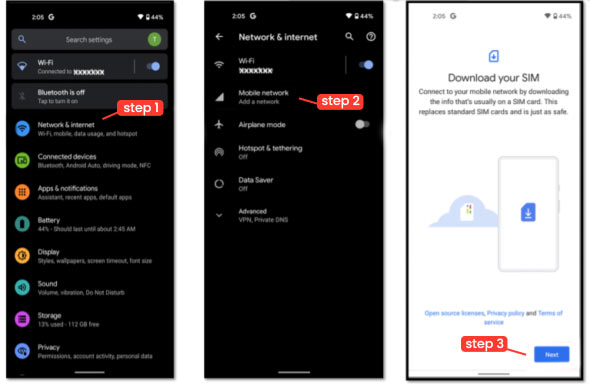
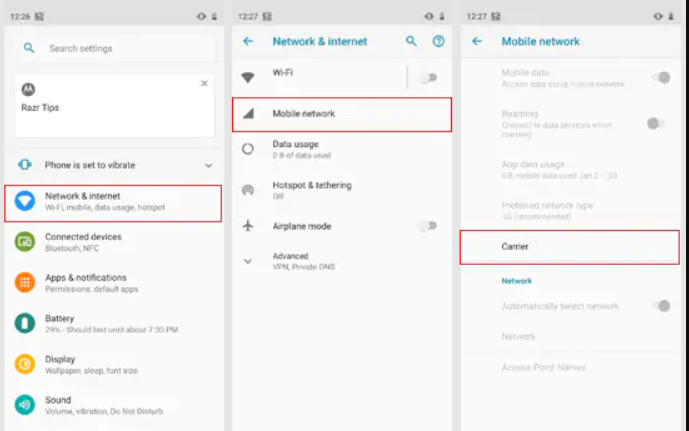
Go to Settings and select the Network & Internet option.
Now, select Mobile network and then click on the option, which says “Download a SIM instead?”
Click Next and enter the activation code manually by going through on Need help? option.
Now, select the option “Enter it manually” and start typing the code in this format only – LPA:1$smdprd.jio.com$Activationcode followed by the received 32-digit activation code via SMS or Email.
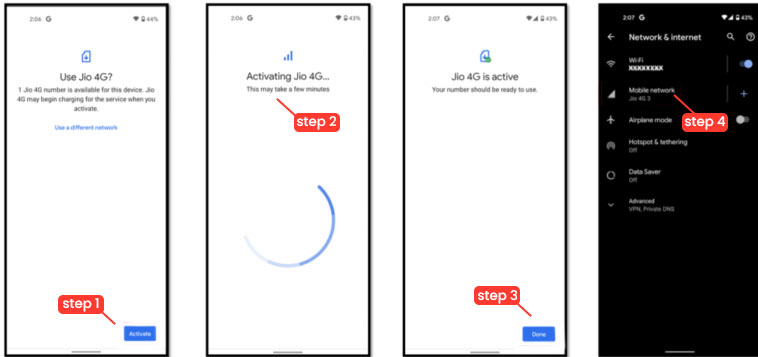
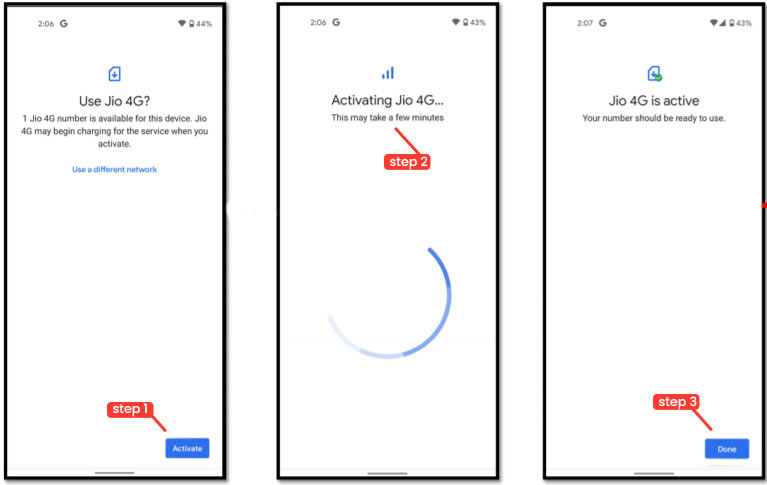
Finally, click on Activate and then to conclude the steps, click Done.
For Motorola models:
Follow Steps 2 through 10 as mentioned above, then follow these steps:
For Motorola Razr 5G handset, go to the Settings option and choose Network & Internet.
After this, navigate and click on the Mobile network button and select Next.
In case, you own a Motorola Razr device, after selecting the Mobile network option, tap Advanced< Carrier< Add Carrier and click Next.
Next, enter the activation code manually by going through on Need help? option.
Now, select the option “Enter it manually” and start typing the code in this format only – LPA:1$smdprd.jio.com$Activation code followed by the received 32-digit activation code via SMS or Email.
Finally, click on Activate and then to conclude the steps, click Done.
Activate Vi eSIM – Here’s How
For Vi postpaid customers, you are only eligible for the process, only if you live in Mumbai, Delhi, Gujarat, Karnataka, Maharashtra, Punjab, UP East, and Goa.
Start by sending the SMS in the given format – SMS eSIM< space >registered email id to 199.
You will get a valid confirmation SMS on your email ID, only if it is valid.
In the next step, reply to the SMS by typing “ESIMY” and confirm it for the eSIM change request.
In case your provided email id is invalid, you will get an SMS from 199, asking for entering the right email id.
You will also receive another SMS from 199 asking for permission over a call.
Once you allow them, you will be notified with a final SMS obtaining a QR Code that will be directed to your registered email ID.
In the next step, you will need to select your device from the list and then follow these below-guided steps to scan the QR code.
For Apple iPhone users:
Connect your device to strong Wi-Fi or mobile data. And then head to the Settings option and select Mobile Data.
In the next step, click on the option “Add Data Plan”.
Finally, scan the QR code which you have received on your registered email id and pursue the on-screen prompts.
For Samsung users:
Head to Settings and select Connections.
Now, go to the SIM Card Manager option and choose “Add Mobile Plan”.
Finally, click on the option, which says Add Using QR Code, and scan the QR code received on mail.
For Google Pixel users:
Navigate to Settings and then explore Network & Internet.
After this, click on Mobile Network and go to Download a SIM instead and click Next.
Scan the QR code and follow the on-screen instructions.
For Motorola Razr users:
Start by heading towards the Settings option and then click on the Network & Internet option.
Now, you need to click on “Next” to proceed further with the steps.
Finally, scan the received QR code and follow the instructions.
Airtel eSIM Activation – Here’s How
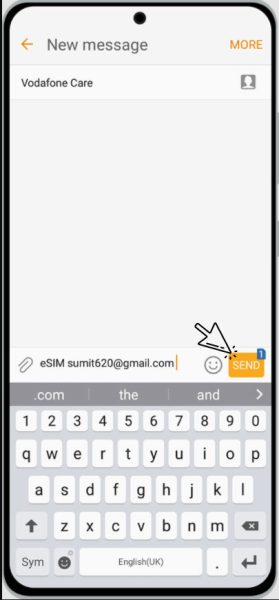
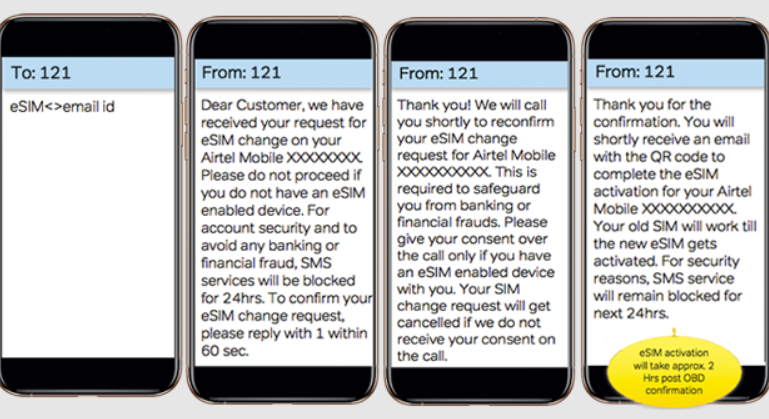
For starting the process, SMS eSIM <space> your registered email ID and send it to 121.
You will get an SMS from 121 stats that the process has been started, only in case you have entered the valid email ID.
Now, you will need to reply by typing ‘1′ and send the SMS within 60 seconds.
You will also receive another SMS from 121 asking for permission over a call.
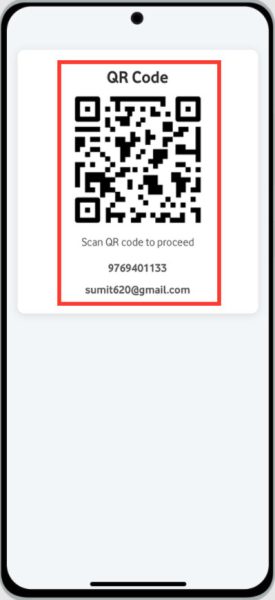
Once you allow them, you will be notified with a final SMS obtaining a QR Code that will be directed to your registered email ID.
In the next step, you will need to select your device from the list and then follow these below-guided steps to scan the QR code.
For Apple users:
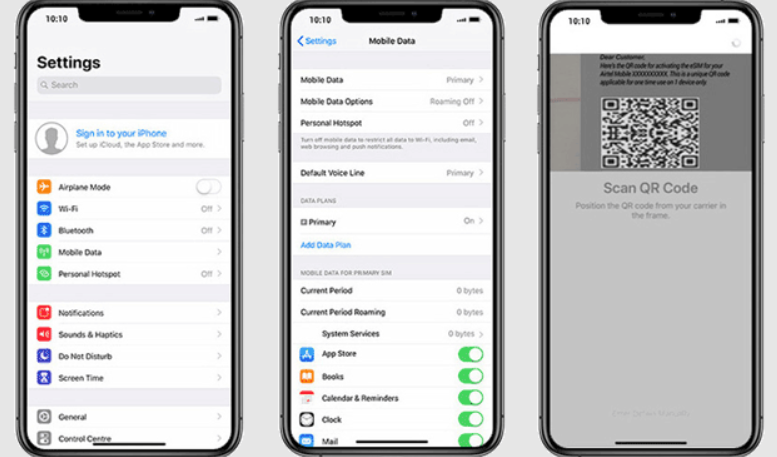
Go to Settings and select the Mobile Data option.
Now, navigate to “Add Data Plan” and then scan the QR code to complete the steps.
For Google Pixel users:
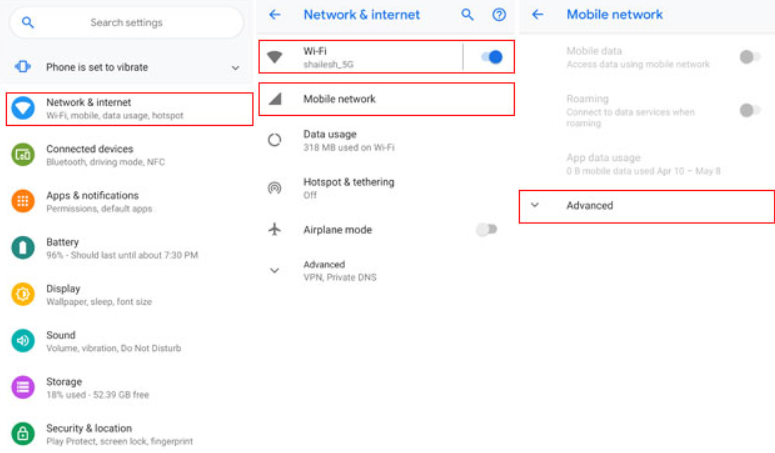
Go to Settings and head to Network & Internet option.
Now, select Wi-Fi and connect your device with a strong WiFi network.
In the next step, click Mobile Network and then choose Advanced.
After this, click on Carrier and tap Add Carrier.
Finally, scan the QR code and click on Download and then tap Done.
For Motorola Razr users:
Go to Settings and head to Network & Internet option.
Click Mobile Network and then choose the Carrier option, followed by “Add Carrier”.
To conclude the steps, click on the QR code, and when completed click Download.
Scan the code and click Done.
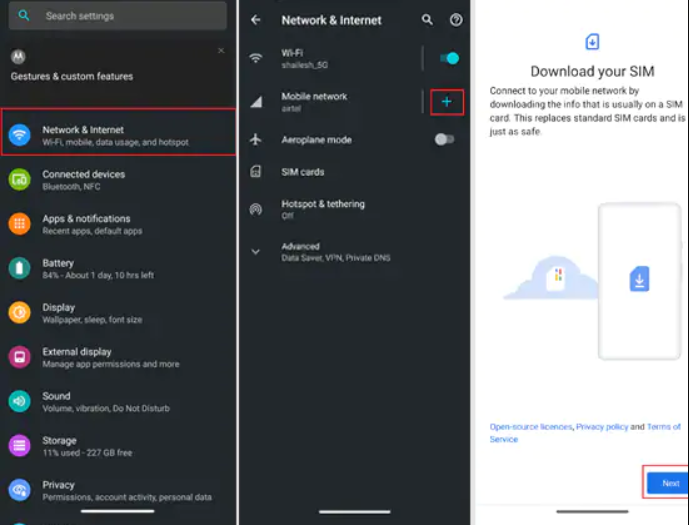
For Motorola Razr 5G users:
Navigate to Settings option to select Network & Internet, then click on + sign besides Mobile Network option.
Finally, hit Next to download your SIM and scan the QR code.
Once it is done, click Activate.
For Samsung Users:
Click Settings and select Connections to move forward and choose SIM Card Manager.
Now, select “Add Mobile Plan” option and then tap “Add Using QR” and follow the on-screen instructions to complete the activation.
So, these are the steps that you need to follow to activate your eSIM card.
Published On : May 19, 2022 by: Staff Writer/Category(s) :eSIM


Leave a Reply